Gallalaus: Navigating the Frontend of Full Stack Development
I'm Flavius Cojocariu, a friendly and experienced Software Engineer, based in München, Germany, with a keen focus on crafting amazing web experiences. I believe in embracing life's adventures and constantly seeking opportunities to grow and learn. Let's dive into my story!
My work philosophy revolves around constant growth and innovation. I believe that staying curious and adaptable is crucial in an ever-evolving landscape. Through each project, I aim to deliver not just results but also meaningful experiences that resonate with audiences and clients alike.
Throughout my career, I've been fortunate enough to contribute to some pretty fantastic projects. From responsive websites that adapt like chameleons to web applications with seamless user experiences, I take immense pride in every line of code I write. Some of the companies I have worked for are part of the IoT/fintech industry, travel industry, and even telecom and market research.
I'm excited about the future and the possibilities it holds. I'm open to new collaborations, challenges, and endeavors that push the boundaries of creativity and innovation.
Thank you for taking the time to explore my portfolio. If you have any questions, want to discuss potential projects, or simply want to connect, don't hesitate to reach out.
Embark on the next leg of our Full Stack Development expedition with this fifth post in the Gallalaus series! In this chapter, we explore the rationale behind selecting Angular and NgRx for our frontend, discussing their advantages, architectural considerations, and their role in achieving our project's goals. We will look at what are the components of our frontend application.
Why angular, ngrx, and angular material UI?
Over a year ago, as I embarked on my current adventure, I transitioned into a full-stack role. During this time, I adopted Angular, NgRx, and Material UI stack. This decision formed the foundation for choosing this stack for the frontend application in our project.
One key reason is my familiarity with this stack from continuous daily use. This deep familiarity minimizes the learning curve and enables us to develop the MVP swiftly, aligning perfectly with our project's objectives.
I will use Angular version 14, complemented by compatible versions of NgRx and Angular Material UI.
In today's landscape of numerous frontend frameworks and libraries, selecting the right stack can be challenging. For our specific project and objectives, opting for a stack with minimal learning requirements is a strategic choice. However, it's important to note that the knowledge shared in this series is not restricted to this stack alone. The principles and concepts presented here can be readily applied to other stacks, which follow a similar architecture.
Angular in the stack
For the MVP purpose, we will be using the standard Angular architecture by organizing code into modules. We are going to add state management to simplify the components and isolate side effects.
In this section, we will see why Angular an excellent choice for a frontend framework could be.
One major advantage that Angular brings is the component-based architecture. This way, we can organize our code into reusable building blocks. As we will see further in this article and blog series, this is a significant advantage. This way, we will end up with a well-organized and clean codebase.
Another advantage of using Angular is the declarative UI, which means that Angular relies on HTML to determine the UI state. This way, we do not have to do any low-level DOM manipulation to construct the UI.
Another advantage of using Angular in our project is the robust testing ecosystem that Angular provides, which will make our code less error prone.
In the end, Angular encourages best practices through a well-defined folder structure and project organization. This approach perfectly aligns with our adherence to DDD principles. With this, we can efficiently organize our codebase and maintain clear boundaries between features.
To gain deeper knowledge of Angular, please consult the documentation: Angular - Introduction to the Angular docs
NgRx as a state management library
NgRx is a Redux-like library that allows us to easily manage the state of our frontend application.
By using this approach, and therefore NgRx, we can separate the UI and component logic from the side effects, such as calling APIs and managing the state of the application.
NgRx offers a robust ecosystem to help deal with the application state. The main components are:
- Store: a controlled state container
- Selectors: pure functions used to derive and construct pieces from the state
- Reducers: pure functions that handle state changes
- Actions: events dispatched from components and services to interact with the state
- Effects: listen to actions, powered by RxJS, and dispatch new actions to reduce the state based on outside interactions, such as network communication.
To gain a deeper knowledge about how this works, please consult the NgRx documentation: NgRx - What is NgRx?
Modules and components
In the previous article, we identified 3 major modules:
Task/Bug Module
User Management Module
System Module.
To keep this simple in the application we will name them as follows:
Board Module -> The task is bound to a list which is bound to a board; therefore, we can't have tasks without a board
Authentication Module -> this module will encapsulate the components and state needed for user management.
Navigation Module -> This would be a frontend specific module, which can be seen as the system module.
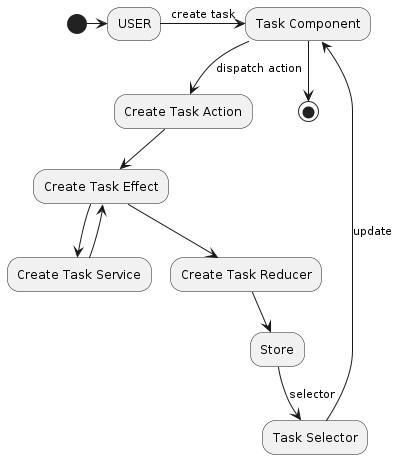
As we can see in the activity diagram above, that would be an example of how the flow will be in the front-end application.
We can simply now derive the components that are encapsulated inside each module. For the series, I will only dive into the Board Module. The rest I will leave as an exercise for you.
Board Module will be composed of the following components:
Board component
Board detail component
Task list component
Task list detail component
Task component
Task detail component
Store structure
Our store will be structured based on the features, and therefore it will look like this:
{
    "boards": {},
    "taskLists": {},
    "tasks": {},
    "auth": {},
    "user": {}
}
Each of the components of the store will be organized as we have the data structure in our DB. This way we can keep a better consistency throughout our application.
The store is organized based on the components from each module, and not around the modules themselves. This way we can better control the display elements, making it easier to maintain.
The module organization of the code helps keep the DDD principles, but the store should always reflect the component state of the application so that we can reuse it as much as we can.

